This article helps beginner bloggers learn how to create blog images using AI tools with practical steps, real experience, prompt writing tips, and SEO-friendly strategies.
Introduction: I Was Spending Too Much Time Searching for Images
When I first started blogging, learning how to create images using AI completely changed the way I handle visuals for my blog. I would spend hours searching on free image websites trying to find the “perfect” image for my blog post. Sometimes the images looked too generic. Sometimes they didn’t match my topic. And many times, the same image was already being used by hundreds of other blogs. It made my blog look ordinary. Then I discovered AI image generation.
At first, I thought I would never be able to create images using AI because it seemed complicated and only meant for designers But once I started experimenting, I realized something AI can help bloggers create unique images quickly, even without design skills. That completely changed my workflow.
Now, instead of wasting hours searching for stock photos, I can create custom images that perfectly match my blog content. And honestly, it makes blogging much more fun.
In this guide, I’ll share how I personally use AI to create blog images, what mistakes I made in the beginning, and how beginners can start easily.
What is AI Image Generation?
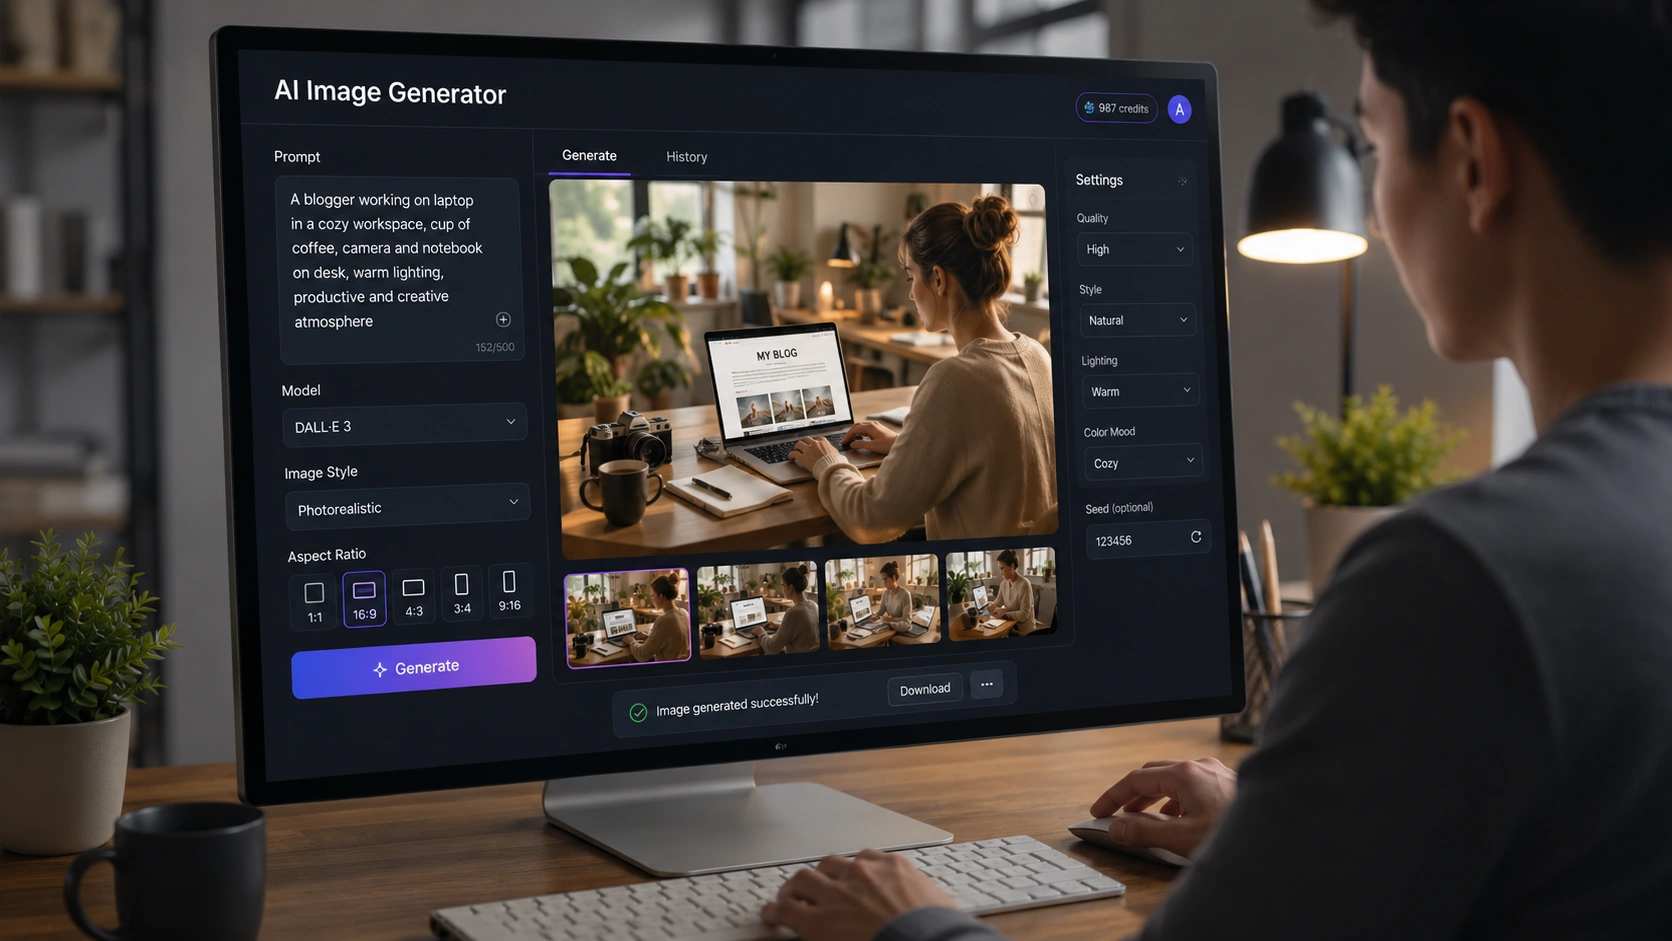
Create images using AI is a process where you use artificial intelligence tools to generate visuals by simply describing what you want in text form. You don’t need to search for photos online anymore. You just type what you want, and the AI makes an image based on your description.
For example, you can type: “A beginner blogger working on a laptop in a modern workspace.”
After that, the AI creates the image in a few seconds. It’s pretty interesting when you try it for the first time because it feels like the AI is understanding your imagination.
When I started using AI image tools, I thought it was very simple. Just type a sentence and get a perfect image. But after some time, I noticed the results were not always good. Sometimes the image looked weird, sometimes the face was wrong, or the background didn’t match what I wanted.
That’s when I understood that AI image generation is not only about clicking a button. The prompt matters a lot. If you write a better prompt with clear details, the AI usually gives better results. Even small changes in words can change the final image completely.
So after using these tools regularly, I realized one thing — AI image generation is easy to start, but getting really good images takes practice. The more you experiment with prompts, the better your images become.
Why AI Images Are Useful for Bloggers
After using AI images for my blog for some time, I noticed they actually make blogging much easier. At first I only used them for testing, but later they became part of my regular workflow.
1. Unique Images
This was the main reason I started using AI images.
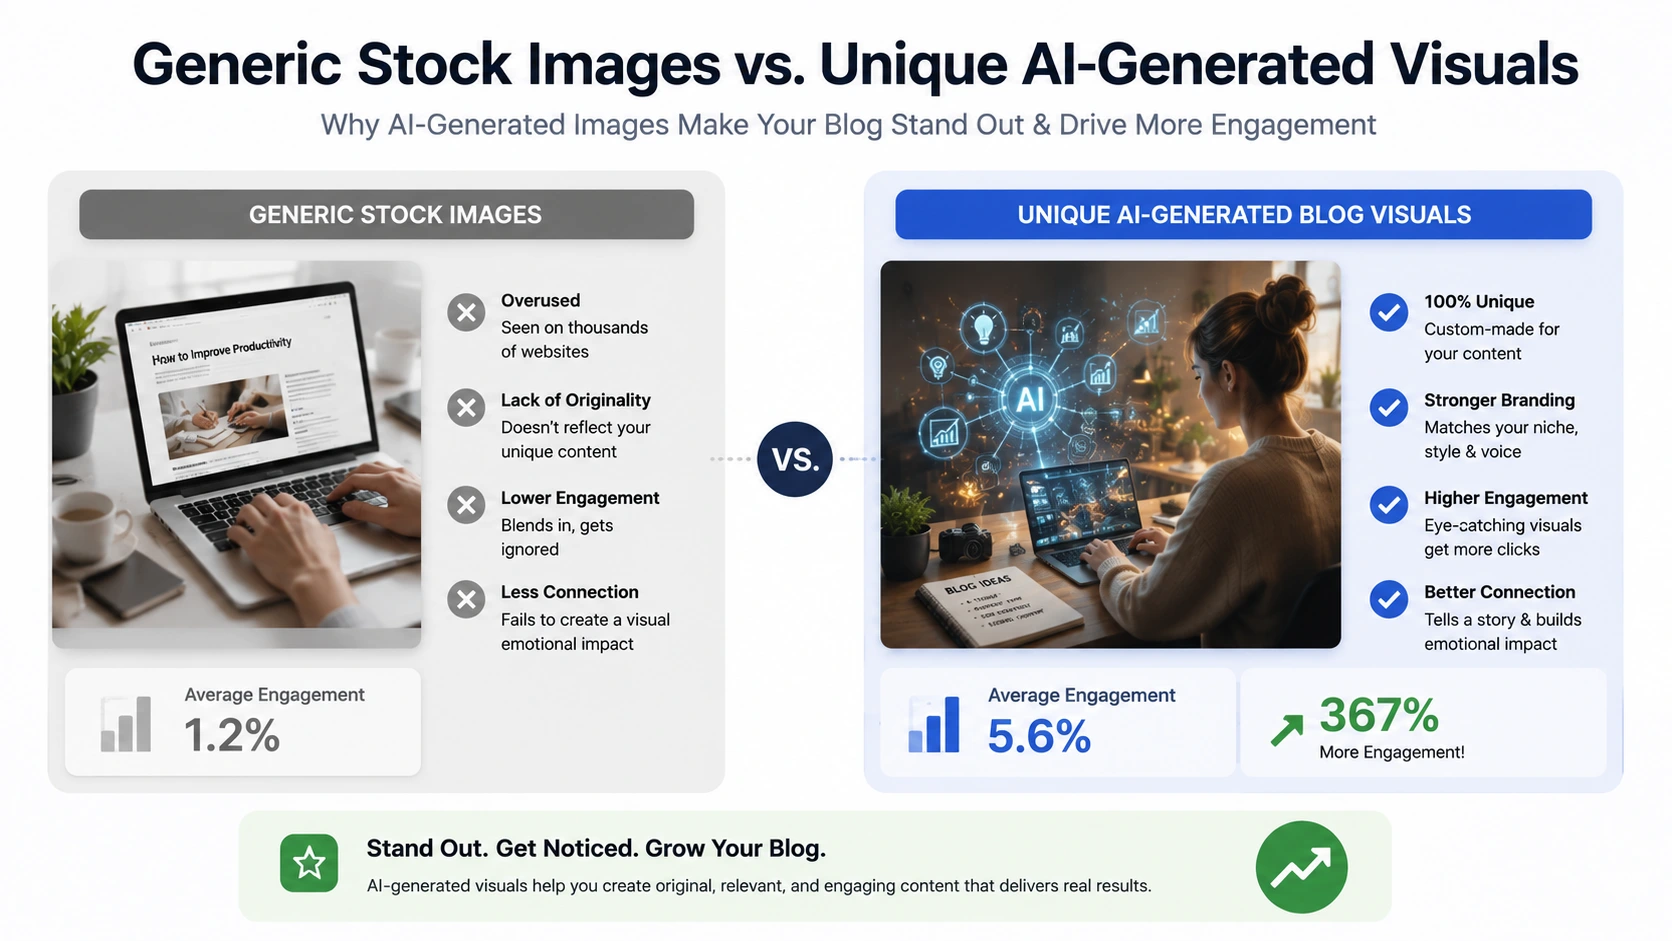
Most stock photos are used on hundreds of websites, so after some time they all start looking the same. But with AI, you can create something different for your own blog. Even a simple custom image can make your post feel more original.
I also noticed that unique visuals help a blog stand out more, especially when people are scrolling fast.
2. Saves Time
Earlier, I spent too much time searching free image websites. Sometimes I would open 10–15 tabs and still not find the image I wanted.
Now I can just describe the image and generate it in a few minutes. It is much faster, especially when you already know what type of image you need for the blog post.
3. Better Pinterest Performance
Pinterest is very visual, so images matter a lot there.
When I started making custom AI images and Pinterest pins, my content looked cleaner and more professional. I also noticed better engagement on some pins because the designs looked less generic compared to normal stock images.
4. Beginner-Friendly
One good thing about AI image tools is that you do not need design experience to start.
You don’t have to learn complicated software first. If you can explain your idea in simple words, you can create decent images. That is why AI image generation is very useful for beginner bloggers who want better visuals without spending too much money or time.
My Biggest Problems in the Beginning
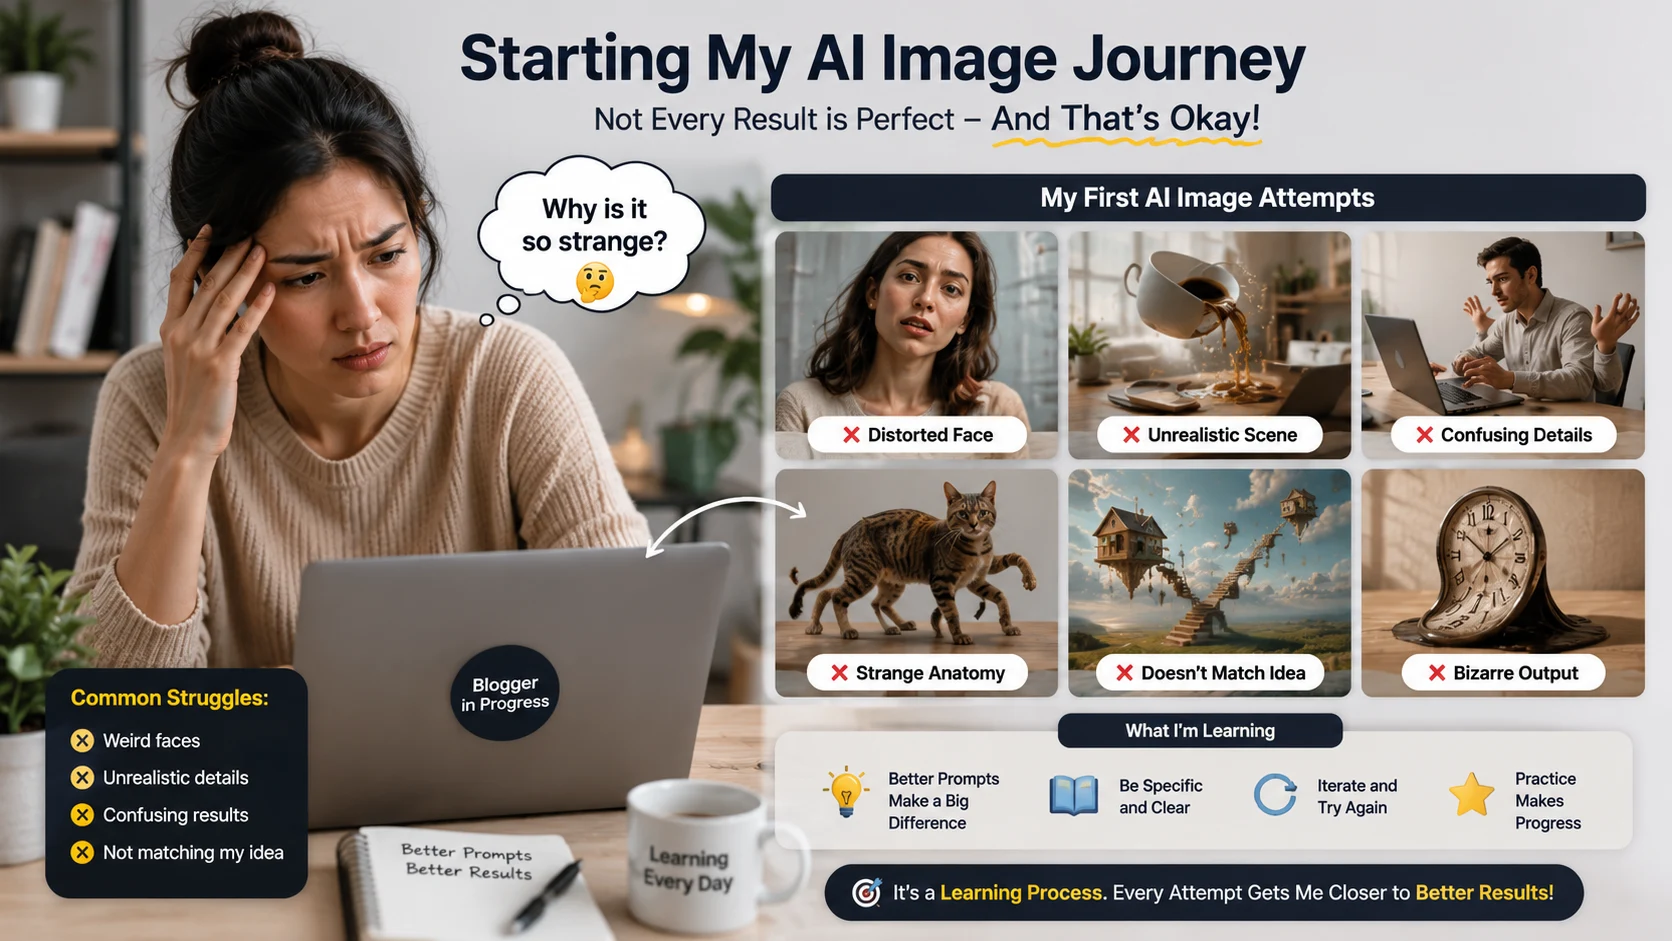
Let me be honest — my first AI images were not good at all.
Some images looked unrealistic. Some had weird faces, strange hands, or extra fingers. A few images looked so artificial that they didn’t even feel usable for a blog. At that time, I thought the AI tool itself was bad.
But later I realized the real problem was my prompts.
Most of my prompts were way too short. I used to type things like:
“Blogging image”
And then I expected the AI to somehow understand exactly what I wanted. Obviously, that didn’t work very well.
AI tools need proper details. Things like the background, lighting, colors, camera angle, style, and mood actually make a big difference. Once I started adding more details to my prompts, the image quality improved a lot.
I also learned that small wording changes can completely change the final result. Sometimes just adding words like realistic lighting or modern workspace made the image look much better.
That was probably the biggest lesson for me in the beginning: good AI images mostly come from good prompts, not just good tools.
Best AI Tools for Creating Blog Images
There are a lot of AI image tools available now, and honestly, new ones keep appearing every few months. In the beginning, that can feel confusing because every platform claims to be the “best.” But for blogging, you really do not need the most advanced or complicated tool.
Most beginners just need something simple that can create decent blog images, Pinterest pins, thumbnails, or featured images without taking hours to learn.
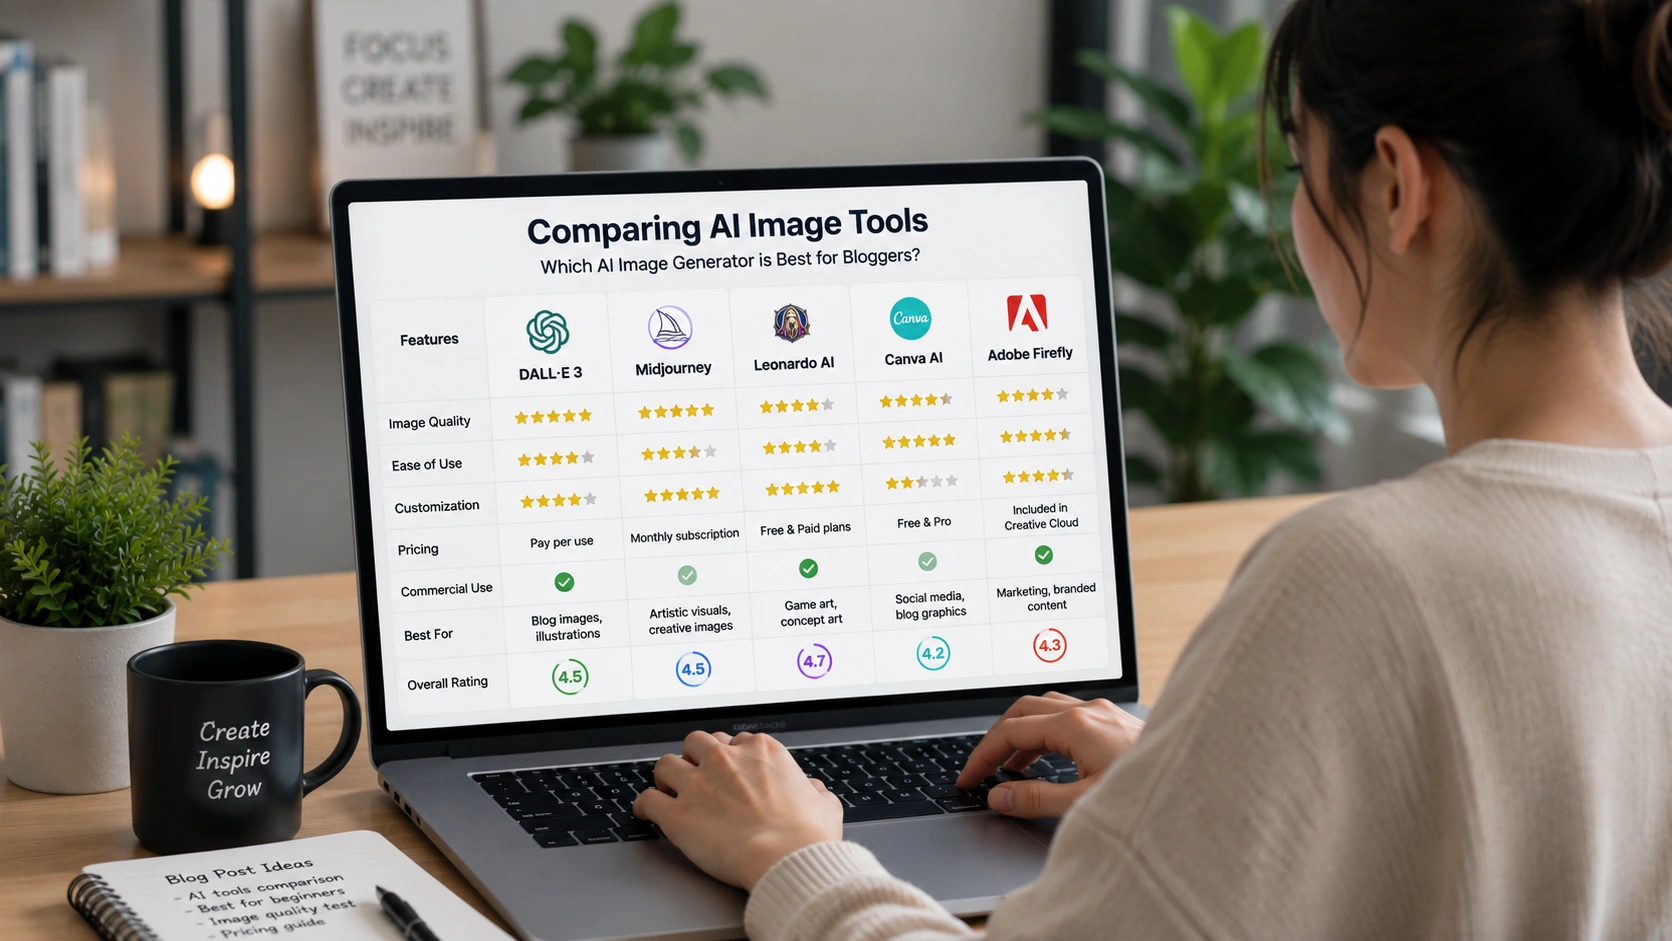
After trying different tools myself, these are the ones I found easiest and most useful for bloggers.
1. ChatGPT Image Generation
This is probably one of the easiest ways to create AI images right now.
You just describe the image in normal English, and the AI generates it for you. You do not need to learn technical settings or complicated commands in the beginning.
For example, instead of writing complex prompts, you can simply type something like:
“Create a clean workspace image for a blogging article with a laptop, coffee mug, and soft lighting.”
That’s enough to get started.
What I personally like is that you can also improve the image by continuing the conversation. If something looks wrong, you can ask the AI to change the background, fix colors, remove objects, or make the image more realistic.
It feels more natural compared to many other AI image tools.
2. Canva AI Image Generator
Canva is already popular among bloggers, so its AI image feature feels very useful.
The good thing is that Canva is not only for generating images. You can also edit them immediately, add text, create Pinterest pins, blog banners, thumbnails, or social media graphics in the same place.
That saves a lot of time because you do not need to switch between multiple tools.
I found Canva especially useful for Pinterest. You can generate an image, place your blog title on it, change fonts, add colors, and create a full pin design within minutes.
For beginners, Canva feels easier because the interface is simple and clean.
3. Leonardo AI
Leonardo AI is a good option if you want more detailed or realistic images.
Compared to beginner tools, it gives more control over image styles and quality. The images often look sharper and more professional, especially for realistic scenes or creative artwork.
In the beginning, the platform may look slightly confusing because there are more settings and options. But after using it a few times, it becomes easier to understand.
I noticed that Leonardo AI works well for:
- Realistic blog images
- Creative illustrations
- Gaming or tech-style designs
- Detailed backgrounds
If you like experimenting with image styles, this tool is worth trying.
4. Microsoft Designer
Microsoft Designer is another simple tool that works well for beginners.
The interface is clean, and you can quickly create graphics for blogs or social media posts without spending too much time learning the platform.
One thing I liked is that it gives ready-made design suggestions, which helps when you do not know how to arrange text or images properly.
It is useful for:
- Social media posts
- Simple blog graphics
- Promotional images
- Quick visual content
For beginners who want something easy and lightweight, it does the job well.
5. Adobe Firefly
Adobe Firefly gives more polished and professional-looking results.
The controls are still beginner-friendly, but the image quality often feels cleaner and more refined compared to basic AI tools. It is especially useful if you care about design quality or branding.
I also noticed that text effects and artistic styles work really well in Firefly.
Some bloggers use it for:
- Featured blog images
- Creative text designs
- Marketing graphics
- Professional-looking visuals
Even though Adobe tools usually feel complicated, Firefly is much simpler than software like Photoshop, so beginners can still use it without much trouble.
Final Thoughts
You honestly do not need to try every AI tool on the internet.
For most beginner bloggers, even one good tool is enough to start creating better visuals. The main thing is learning how to write better prompts and understanding what type of images fit your content.
Over time, you naturally figure out which platform works best for your blogging style.
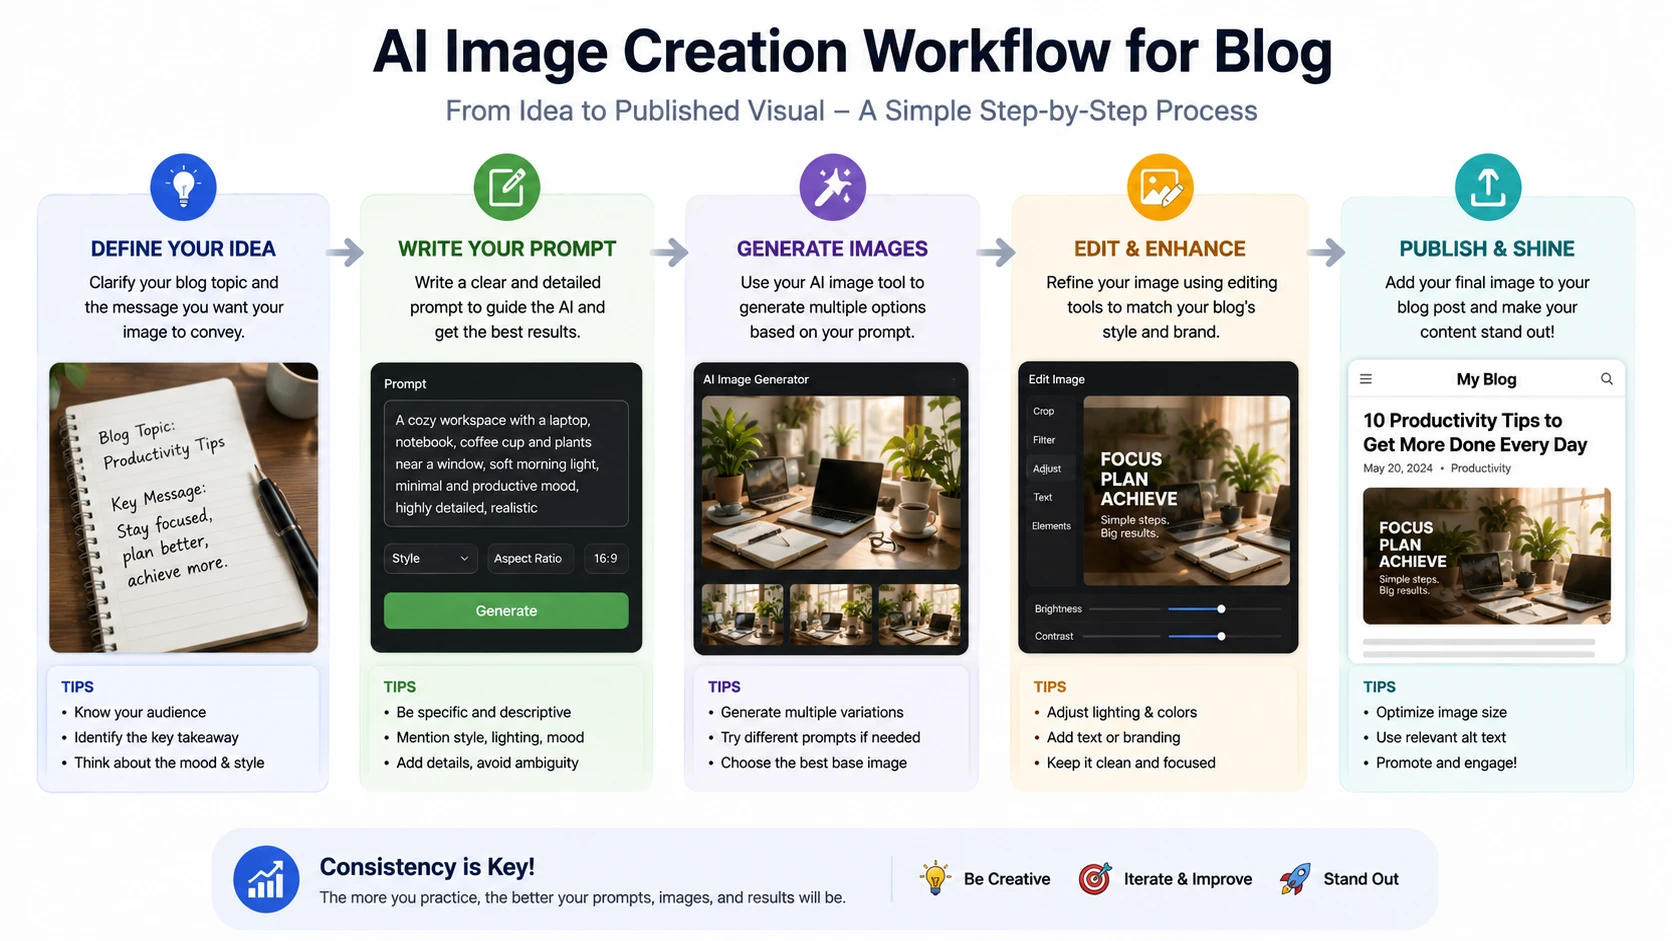
How I Create AI Images for My Blog
When people see blog visuals, they often think it’s difficult to create images using AI, but my actual process is very simple. But honestly, the method I use is pretty simple. Over time, after creating hundreds of images and dealing with plenty of bad results, I realized that having a small workflow makes everything easier and saves a lot of time.
In the beginning, I made the mistake most beginners make — I would open an AI image tool, type a random prompt, and hope the AI magically created something perfect. Sometimes the image looked decent, but most of the time it felt completely unrelated to the article. The style would look strange, the mood wouldn’t match, or the image simply looked too artificial.
After a lot of trial and error, I understood that good AI images usually come from having a clear idea before generating anything. So now, whenever I create images for a blog post, I follow a simple process.
Step 1: Understand Your Blog Topic
Before creating any image, I spend a little time thinking about what the blog post is actually trying to say and I don’t mean just the main topic or keyword.
I try to understand the feeling behind the article because that’s what usually makes an image connect better with readers. A good blog image is not only there to “look nice.” It should support the mood of the content and instantly give visitors an idea of what the article is about. So before opening any AI image tool, I usually ask myself one simple question:
“What should this image show or make people feel?”
This question helps me avoid creating random images that look attractive but have no real connection to the blog post.
For example, if I’m writing an article about blogging struggles, I probably don’t want a perfect luxury office with someone smiling at the camera. That would feel unrealistic and disconnected from the topic. Instead, I’d want something more relatable — maybe a tired blogger working late at night, messy notes on a desk, multiple tabs open on a laptop, or someone looking stressed while checking analytics.
On the other hand, if the article is about SEO growth or increasing traffic, then the image should feel more positive and progress-focused. In that case, charts, analytics dashboards, ranking graphs, or growth visuals make much more sense because they match the goal of the content. I’ve noticed that when the image emotion matches the article emotion, the overall blog feels more professional and engaging. Sometimes I also think about the type of audience reading the article.
For beginners, I may use visuals that feel simple, educational, or slightly confusing to match their learning stage. For advanced topics, I prefer cleaner and more professional-looking setups.
To organize my thoughts, I often write down a few quick visual ideas before generating anything. Nothing complicated — just small phrases that describe the direction I want.
For example:
- Beginner confusion
- Professional workspace
- Pinterest traffic growth
- Late-night blogging
- Productivity setup
- Freelancer desk
- Content planning
- SEO analytics
- Creative workspace
These simple notes help me later when writing prompts because I already know the kind of image I’m trying to create. This step may sound small, but honestly, it makes a huge difference.
When I skip this part, the AI usually creates images that feel random or disconnected from the article. Sometimes the visuals look beautiful but still don’t fit the content properly. But when I first understand the mood, message, and purpose of the blog post, the AI results become much more accurate and useful.
In my experience, spending just a few minutes planning the image idea before generating anything saves a lot of editing, frustration, and wasted generations later.
Step 2: Write a Detailed Prompt
This is honestly the part where I made the biggest mistake in the beginning. When I first started creating AI images for my blog, I thought the AI would automatically understand what I wanted. I used to write very short prompts like: “Blogging image”, “SEO photo”, “Person working on laptop”, etc. and then I would sit there wondering why the images looked so strange or low quality.
Sometimes the AI created people with weird hands. Sometimes the background looked messy. Other times, the image had nothing to do with my article. A few images looked nice at first glance, but when I added them to my blog post, they just didn’t fit the content.
After wasting a lot of time regenerating images again and again, I finally understood something simple. The AI is only as good as the instructions you give it.
Now, before generating anything, I try to explain the image clearly, almost like I’m describing a scene to a real photographer. Instead of writing one or two words, I include small details like: Who is in the image, What they are doing, The type of workspace or background, Lighting style, Mood of the image, Realistic or artistic style, Image quality, Aspect ratio. For example, instead of writing: “Blogging image”
I now write something like: “A beginner blogger working on laptop in modern clean workspace, soft lighting, realistic style, professional blogging environment, high quality, 16:9”
The difference is honestly huge. The image suddenly looks more natural and more connected to the blog topic. The AI stops guessing randomly because the scene is already clear in the prompt. One thing I personally noticed is that small words can completely change the final result.
For example, I once created the same image twice. In the first prompt, I only wrote “workspace.” In the second one, I added “minimal workspace with warm lighting.” The second image looked ten times better even though I only changed a few words.
The lighting felt softer, the desk looked cleaner, and the whole image had a more professional blog-style look. I also learned that the mood of the prompt matters a lot. If my article is about burnout or blogging struggles, I don’t want the image to look too perfect or fake. I may add phrases like: late-night blogging, tired creator, dark room lighting, messy desk, stressful work environment. But if the article is about success, productivity, or traffic growth, then I use words like: modern office, clean workspace, bright lighting, organized desk, professional environment. These small details help the image match the feeling of the article better.
Another mistake I used to make was adding too many ideas into one prompt. I thought more words always meant better results. But sometimes the AI became confused and mixed everything together in a weird way. Now I try to keep prompts detailed but focused on one clear scene.
Personally, I spend more time writing prompts now than actually generating images. And honestly, that small habit improved my blog visuals more than switching tools ever did.
Even today, my first generated image is rarely perfect. I still adjust prompts, remove words, add details, and test different versions until the image feels right for the article. That trial-and-error process is normal, and over time you naturally learn which types of prompts give the best results.
Step 3: Choose the Right Style
Step 4: Generate Multiple Versions
One mistake I made a lot in the beginning was accepting the very first image the AI generated.
At that time, I thought that was normal. I would type a prompt, generate one image, download it, and use it directly in my blog post. But after some time, I started noticing something.
Many of those images looked “okay” at first, but later they felt average when I actually added them inside the article. Sometimes the lighting looked strange, the face looked unnatural, or the background had weird details that I didn’t notice earlier. A few times, I even published images and later replaced them because they didn’t match the blog properly.
Now I almost never rely on the first result. Instead, I generate multiple versions of the same idea before choosing the final image. Honestly, this small habit improved my blog visuals more than changing AI tools.
Sometimes the first image is decent, but the second or third version looks much more natural and professional. The differences are usually small, but they matter a lot.
For example:
- One version may have better lighting
- Another may have a cleaner background
- One face may look more realistic
- Another image may have better colors or composition
Even changing tiny details can completely change how professional the image feels.
I personally pay close attention to faces and hands because AI tools still make mistakes there sometimes. Earlier, I ignored these problems, but now they stand out immediately when I look at an image.
I also check things like:
- Is the workspace too crowded?
- Does the image match the article mood?
- Is the lighting natural?
- Does the image look realistic enough for my blog style?
- Is there enough empty space for text if needed?
Many times, one version may look technically better, but another one fits the article better emotionally.
For example, while creating an image for a “blogging struggles” article, I once generated four versions. The first one looked very polished and expensive, almost like a corporate advertisement. But the third version had a tired-looking creator working late at night with dim lighting. That image felt much more relatable, so I used that one instead.
I also like generating multiple versions because it gives me creative ideas I didn’t think about before.
Sometimes the AI accidentally creates an interesting background, camera angle, or color combination that actually improves the original concept. When that happens, I take those good parts and build a new prompt around them.
So the process becomes more like experimenting instead of just pressing a button once. Occasionally, I even combine ideas from different versions.
For example:
- I may like the lighting from one image
- The desk setup from another
- And the facial expression from a third version
Then I rewrite the prompt using those details and generate again. This usually gives much stronger results.
Another thing I learned is that AI image generation is rarely perfect on the first try. Earlier, I used to think something was wrong with the tool if the image looked bad. But now I understand that generating multiple variations is simply part of the process. Even professional creators test many versions before choosing the final one.
So now, instead of generating one image and stopping there, I always test a few different variations first. It takes a little more time, but the final image usually looks much better, feels more unique, and matches the blog content more naturally.
Step 5: Edit the Image (Optional)
After generating the image, I sometimes do a little editing before using it on my blog. Nothing too advanced or professional.
In the beginning, I used to upload AI-generated images directly without changing anything. The images looked fine, but after some time I realized they still felt incomplete. They looked more like random AI art instead of actual blog graphics. Now I usually spend a few extra minutes editing them slightly so they match my blog style better.
Most of the time, I only do simple things like:
- Adding the blog title
- Using my brand colors
- Adding arrows, circles, or small icons
- Resizing the image for Pinterest or thumbnails
- Adjusting spacing or cropping
I mostly use Canva because it’s simple, fast, and honestly easier than learning complicated editing software.
What I personally like about Canva is that I don’t need advanced design skills to make images look better. I can quickly drag text, change colors, add shapes, and export the image within a few minutes.
One thing I noticed is that AI-generated images alone sometimes look too plain for blog thumbnails or Pinterest pins. They may look visually nice, but they don’t always grab attention when people are scrolling fast. That’s where small edits help a lot.
For example, when I create Pinterest pins, I almost always add a text overlay because plain images usually don’t perform well there. People should immediately understand what the content is about without reading the entire article.
Earlier, I made the mistake of using tiny text with fancy fonts because I wanted the design to look stylish. But on mobile devices, the text became difficult to read. Now I keep things much simpler. I use Bigger text, Clean fonts, Strong contrast, Short titles, Simple layouts and honestly, those simple designs usually perform better.
I also like using arrows or circles sometimes, especially for tutorial-style content. These small elements help guide attention toward important parts of the image.
For example, if the image contains analytics, traffic growth, or dashboard screenshots, adding a small arrow can make the visual more engaging without making it look overcrowded. Another thing I learned is that consistency matters.
Earlier, every thumbnail on my blog looked completely different because I used random colors and styles. Later I started using similar fonts, colors, and layouts across my images. Slowly, the blog started looking cleaner and more professional as a whole. I still try not to over-edit AI images though.
Too many effects, filters, stickers, or text layers can make the image look messy very quickly. Personally, I prefer clean edits that improve the image without making it feel overloaded.
Sometimes even one small change — like adding a clear blog title or adjusting the colors slightly — can make the image look much more clickable and polished.
Especially on platforms like Pinterest, visuals matter a lot. People scroll very fast, so the image needs to catch attention immediately. I’ve personally seen that simple edited images often perform better than raw AI-generated images because they look more purposeful and easier to understand.
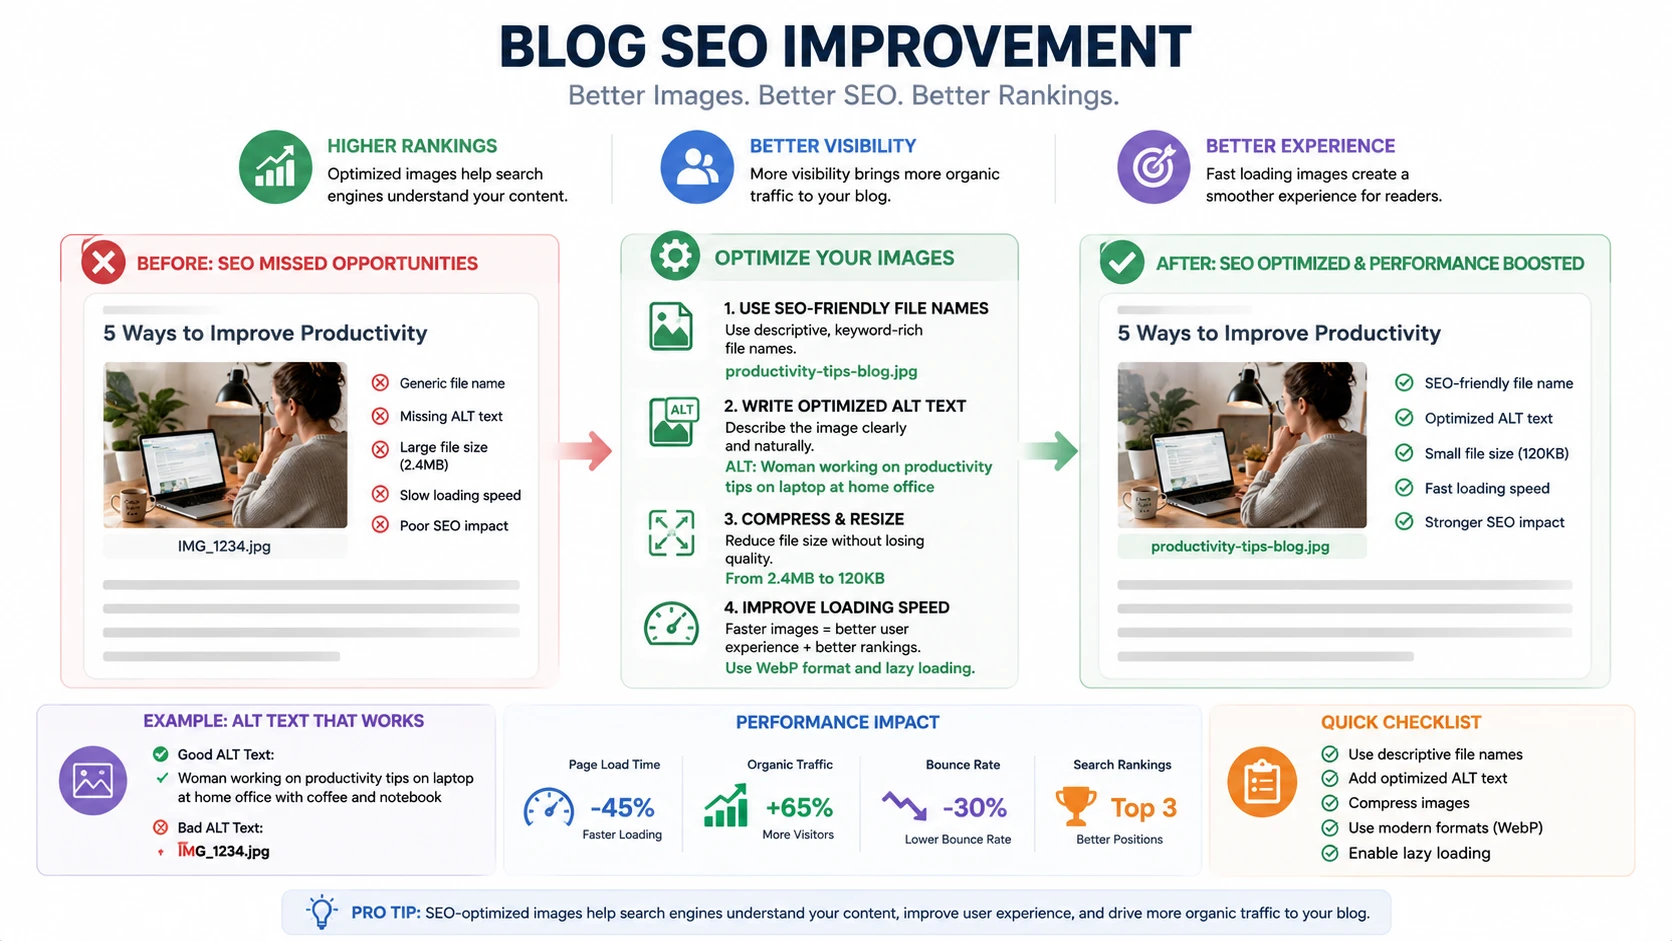
Step 6: Optimize the Image for SEO
This is one part that many beginners completely ignore, including me when I first started blogging.
Earlier, I only cared about how the image looked. If the image was visually good, I uploaded it directly without thinking about file size, format, or SEO. Later I realized that even good-looking images can create problems if they are not optimized properly. One of the biggest issues was website speed.
Some AI-generated images are very large in size, especially high-quality ones. I remember uploading a few large PNG images directly to my blog, and after that, some pages started loading slowly. At first, I didn’t even understand why the website felt heavier.
Later, when I checked my site speed, I realized the images were part of the problem. Now, before uploading any image, I always optimize it first. My process is honestly very simple now.
Usually I:
- Compress the image size
- Convert it to WebP format
- Add proper ALT text
- Use descriptive file names
These things may sound small, but together they make a noticeable difference over time.
Compressing the Image
I personally try not to upload very large files anymore unless absolutely necessary. Earlier, some of my images were over 2–3 MB because AI tools export very high-quality files by default. The problem is that large images slow down page loading, especially on mobile devices.
Now I compress images before uploading them. Most of the time, the quality still looks almost the same, but the file size becomes much smaller. I noticed that even reducing image size slightly can make blog pages load faster.
Converting to WebP
Nowadays, I mostly convert images to WebP format using WebP Convert tools because the file size is usually smaller compared to PNG or JPG.
In the beginning, I ignored formats completely because I thought they didn’t matter much. But after learning more about blogging and SEO, I realized that image optimization is part of the overall website experience.
Now most of my blog images are in WebP format unless I specifically need another format for editing.
Using Better File Names
This is another thing I never cared about earlier.
I used to upload images with random names like:
❌ image123.png
❌ finalimage2.jpg
❌ screenshot-new.png
Honestly, my uploads folder became a complete mess after some time. Now I use simple descriptive names related to the topic.
For example:
✅ pinterest-traffic-strategy-blog.webp
✅ blogging-workspace-setup.webp
✅ seo-growth-dashboard.webp
This keeps my files more organized, and it also gives search engines a better idea about the image topic.
Adding ALT Text
I also try to add proper ALT text whenever possible. Earlier, I skipped this step because it felt unnecessary. But later I understood that ALT text helps both accessibility and SEO. I usually write short, natural descriptions of the image instead of stuffing keywords everywhere.
For example:
“Beginner blogger checking Pinterest traffic analytics on laptop”
Simple and clear.
What I Personally Learned
Over time, I realized that creating blog images is not only about generating something attractive with AI.
The full process matters. The idea behind the image, the prompt quality, the style choice, the editing, and even the optimization step all work together.
Honestly, my workflow is pretty simple now, but it took time to understand what actually works and what only wastes time. One thing I definitely don’t miss is searching stock photo websites for hours.
Earlier, I would spend so much time trying to find the “perfect” image, and even then the photos often looked generic or overused. Now I can create visuals that actually match my content and blog style much faster.
Once you practice a little, the whole process becomes easier, quicker, and much more creative.
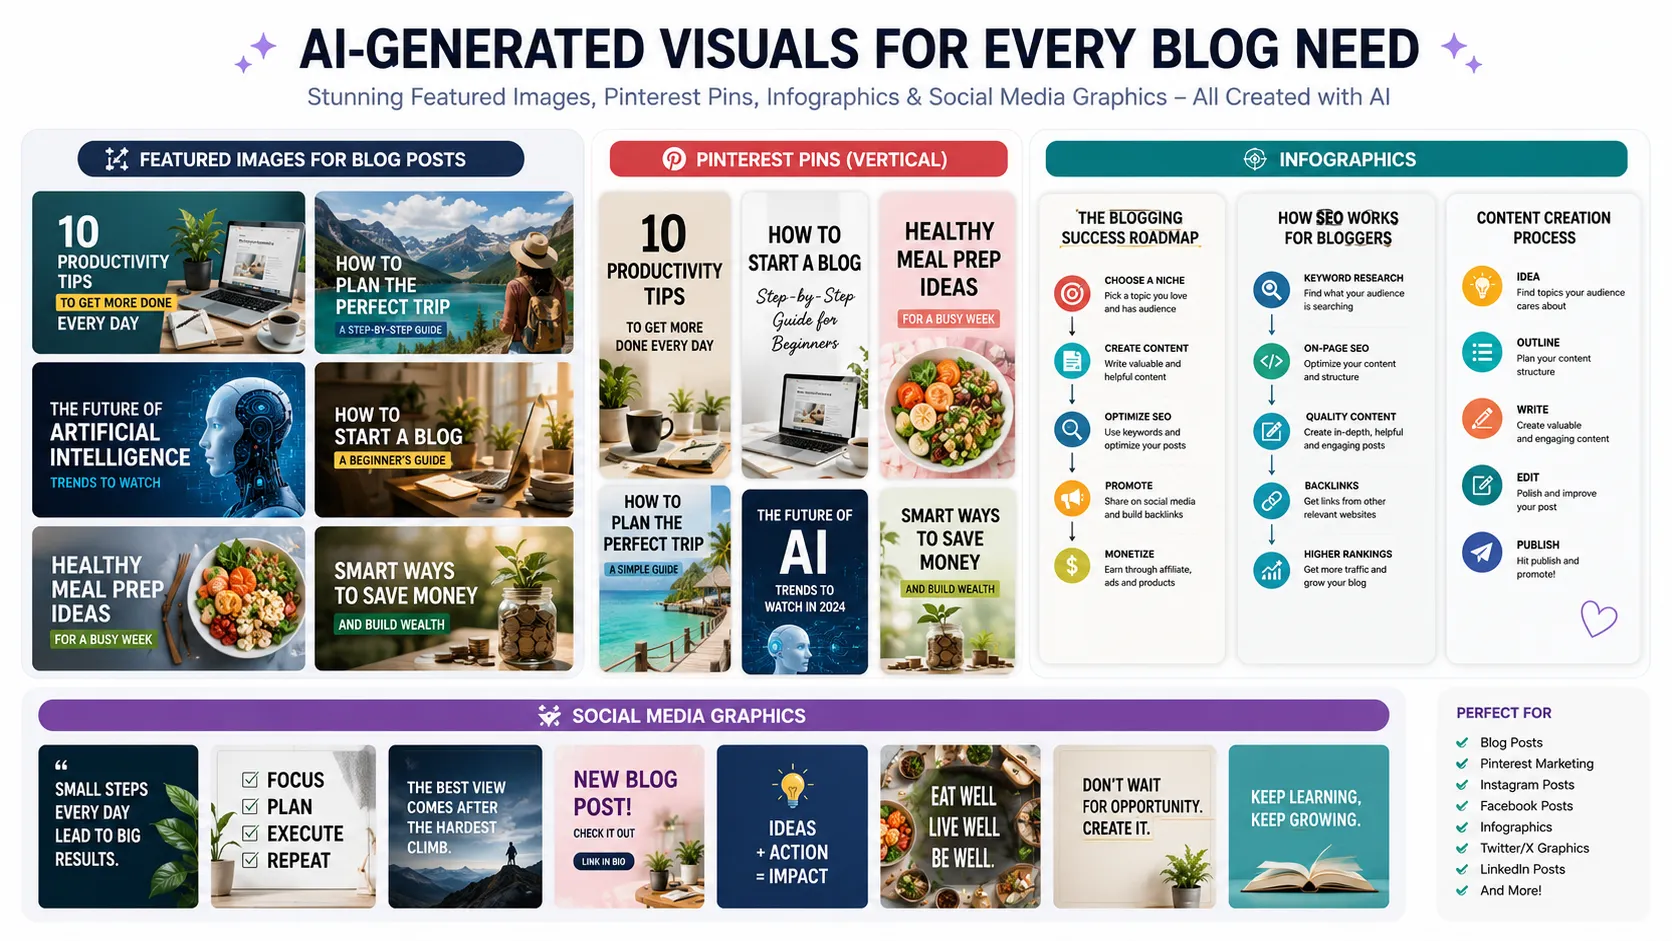
Types of AI Images I Create for My Blog
Over time, I realized that one type of image is not enough for blogging.
In the beginning, I used to create only basic featured images for every article. But later I noticed that different platforms and different types of content need different visuals.
For example, an image that looks good inside a blog post may not work well on Pinterest. A social media graphic may look attractive on Instagram but too crowded for a blog banner. So now I create different types of AI images depending on where the content will be used. These are the image types I personally create most often for my blog.
1. Featured Images
These are the main banner images that appear at the top of blog posts.
Personally, I think featured images are extremely important because they create the first impression of the article. Before readers even start reading, they usually notice the image first.
Earlier, I didn’t pay much attention to featured images. I sometimes used random stock photos or quickly generated images without planning properly. The blog posts looked average because the visuals didn’t feel connected to the content.
Now I spend more time creating clean and relevant featured images because they make the article look more professional immediately. For featured images, I usually prefer:
- Realistic workspaces
- Clean backgrounds
- Minimal distractions
- Soft lighting
- Space for headings if needed
I also try to keep the style consistent across my blog so the website looks more organized overall.
2. Pinterest Pins
This is probably one of the most important image types for my blog because Pinterest can bring a lot of traffic.
Pinterest works very differently compared to normal blog images. Horizontal images usually don’t perform as well there, so I create vertical Pinterest-friendly graphics instead.
In the beginning, I simply reused my featured images on Pinterest, but the results were not very good. Later I learned that Pinterest users scroll very fast, so the design needs to grab attention immediately.
Now my Pinterest pins usually include:
- Large readable text
- Bright but clean colors
- Simple layouts
- Clear titles
- Vertical dimensions
I personally noticed that text overlays matter a lot on Pinterest. Even if the image looks beautiful, people may ignore it if the title is difficult to read.
Sometimes I test multiple Pinterest designs for the same article because small changes in colors or text placement can affect clicks.
3. Infographics
I mostly create infographics for tutorials, guides, and educational content. for example: SEO checklists, Blogging steps, Pinterest strategy guides, Content writing processes, Traffic growth tips.
Personally, I like infographics because they make complicated information easier to understand visually. Earlier, my tutorials contained mostly plain text, and honestly, some sections looked boring. Adding simple infographic-style visuals made the articles feel more engaging and easier to scan.
I still try not to overload them with too many icons or colors though. Clean and simple designs usually work better for me.
4. Comparison Graphics
These are surprisingly effective. I create comparison-style graphics for topics like: Blogging vs YouTube, SEO vs Pinterest Traffic, AI Writing vs Human Writing, Freelancing vs Blogging.
I noticed that comparison graphics attract attention quickly because people naturally become curious about differences between two things. Visually, they are also easy to understand.
Usually, I place two concepts side by side using different colors, icons, or layouts. Sometimes I add “pros vs cons” sections to make the comparison clearer. These types of graphics often perform well on Pinterest and social media because they are simple to consume quickly.
5. Social Media Graphics
I also create smaller graphics for promoting blog posts on platforms like:
Earlier, whenever I shared blog links directly without visuals, the posts didn’t get much attention. But after adding custom graphics, the posts started looking more professional and clickable.
For social media, I usually keep the design cleaner and more eye-catching because people scroll very fast. I often use Bold text, Simple layouts, Clean colors, Minimal clutter.
Personally, I try not to make these graphics overly promotional. I prefer visuals that feel useful or interesting instead of looking like advertisements.
Over time, creating different types of AI images became part of my blogging workflow. Now I don’t just think about “creating an image.” I think about where the image will be used and how people will see it on different platforms.
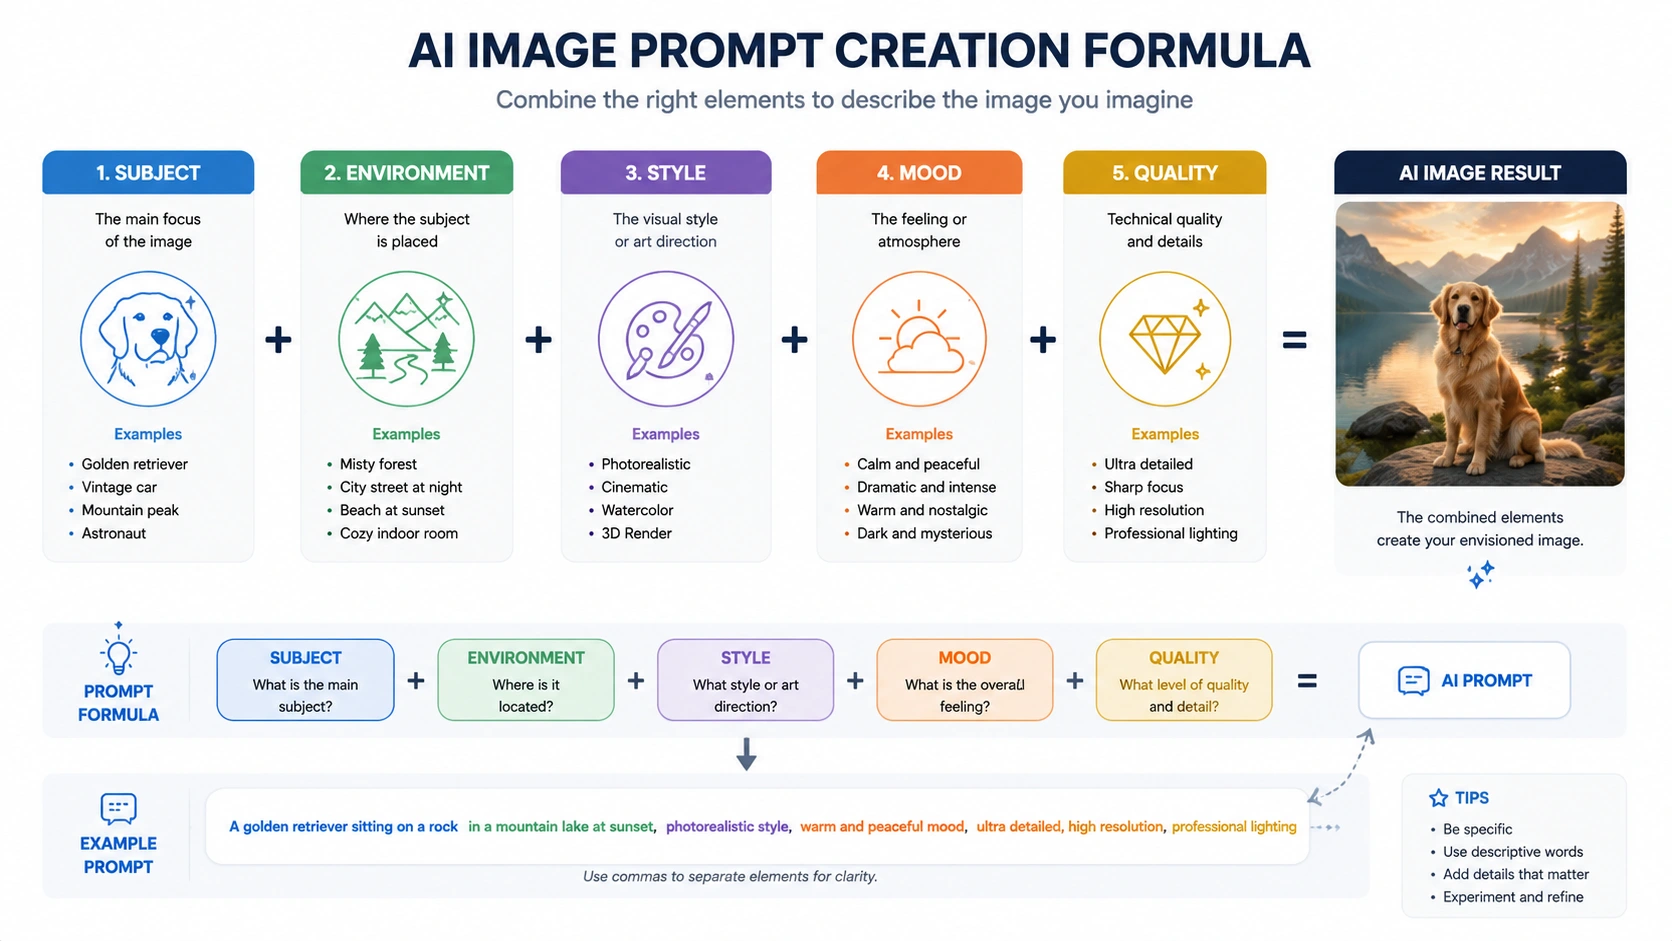
AI Prompt Formula That Helped Me
After creating a lot of AI images for my blog, I slowly realized that random prompts give random results.
Earlier, every time I opened an AI image tool, I wrote prompts differently. Sometimes I added too many details, sometimes almost none. Because of that, the image quality was very inconsistent. One image looked amazing. The next one looked completely unusable.
That’s when I started paying attention to what actually worked in my better prompts. After some trial and error, I noticed that most good prompts followed a similar pattern. So eventually, I made my own simple prompt formula that I still use today.
Subject + Environment + Style + Mood + Quality
Honestly, this small structure made AI image creation much easier for me because I no longer had to think from scratch every single time. Now whenever I create a prompt, I simply fill each part step by step.
For example:
“A frustrated beginner blogger checking low website traffic analytics on laptop, modern workspace, realistic style, emotional mood, high quality, 16:9”
This type of structure improved my image quality a lot because the AI understands the full scene more clearly.
1. Subject
This is the main focus of the image. Basically, who or what should appear in the scene.
For example:
- Beginner blogger
- SEO expert
- Freelancer
- Content creator
- Laptop workspace
- Pinterest marketer
Earlier, I used very vague subjects like “blogging image,” and the AI became confused. Now I try to describe the subject properly so the image has a clear focus. I also noticed that emotions help here.
For example:
- frustrated blogger
- focused creator
- tired freelancer
- happy entrepreneur
These small emotional words make the images feel more human and relatable.
2. Environment
This is the background or setting of the image. Personally, this part changed my results a lot because environment controls how professional the image looks.
For example:
- modern workspace
- home office
- cozy desk setup
- minimal office
- late-night room
- creative studio
In the beginning, I ignored backgrounds completely, and the AI often generated messy or unrealistic spaces. Now I specifically mention the environment because it helps create cleaner visuals.
3. Style
This tells the AI what kind of visual appearance I want. Usually, I choose:
- realistic style
- minimal style
- illustration style
- cinematic style
- infographic style
Personally, I mostly prefer realistic style because it matches my blog better. I noticed that if I skip the style part, the AI sometimes creates cartoon-like images even when I want professional visuals.
4. Mood
This part controls the feeling of the image. Honestly, mood is one of the most underrated parts of prompt writing. The same image can feel completely different depending on the mood words you use.
For example:
- emotional mood
- productive atmosphere
- stressful environment
- calm mood
- motivational feeling
- professional mood
I personally use mood words a lot because I want my images to match the feeling of the article, not just the topic.
5. Quality
Finally, I add quality-related details. Usually things like:
- high quality
- ultra detailed
- sharp focus
- 16:9 aspect ratio
- soft lighting
- natural colors
These details help polish the final image.
One thing I personally learned is that AI works better when the instructions feel organized instead of random.
Earlier, my prompts looked messy because I wrote thoughts in no order. Now this simple formula keeps everything structured and easier to understand.
The best part is that once you practice this formula a few times, prompt writing becomes much faster. Now whenever I create blog images, I naturally think in this structure without even trying.
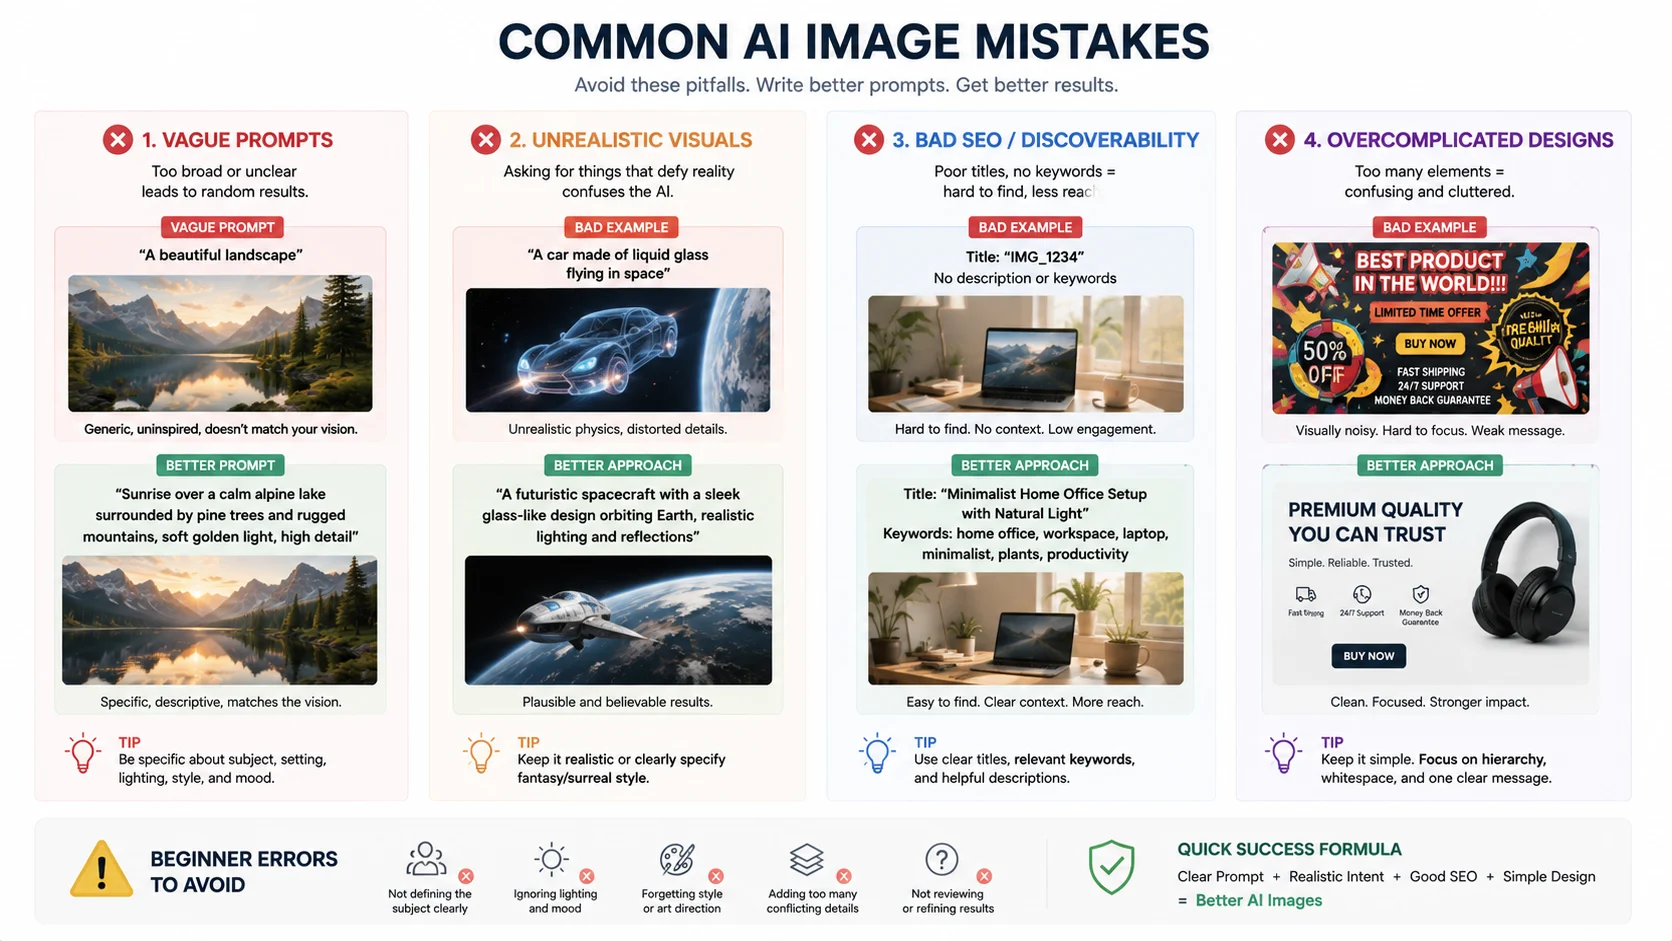
Common Mistakes to Avoid
When I started creating AI images for my blog, I made a lot of small mistakes that I didn’t even notice at first. But later, when I looked back, I realized these mistakes were the reason my images sometimes looked random, low quality, or just didn’t fit the article.
Fixing these mistakes actually improved my blog visuals more than learning any “new tool.” So I always tell beginners to avoid these early, because they waste a lot of time.
1. Using Very Short Prompts
This was my biggest mistake in the beginning. I used to write extremely short prompts like: “blogging image”, “SEO workspace”, “laptop photo”.
And I expected the AI to understand everything. But the result was always the same — generic and boring images that didn’t match my blog topic properly. The AI cannot read your mind. If you don’t explain the scene clearly, it just generates a random stock-like image.
Now I always add proper details like subject, environment, mood, and style. Even a few extra words can completely change the result.
2. Overcomplicated Prompts
After making short prompts, I went to the opposite extreme. I started adding too many details in one prompt because I thought “more words = better image.” But that was also a mistake.
Sometimes I wrote long prompts with too many ideas, mixed styles, and unnecessary descriptions. The AI got confused and produced messy results.
For example, the image would have:
- too many objects
- strange lighting
- unclear focus
- mixed styles
Now I keep a balance. I describe the image clearly, but I avoid stuffing too many unrelated ideas into one prompt. Simple and focused prompts usually work better than long confusing ones.
3. Ignoring SEO
Earlier, I never cared about image SEO at all. I used random file names like:
- image1.png
- final_edit.jpg
- newimage.png
I also skipped ALT text most of the time. Later I realized this was a mistake because it affects both website organization and SEO performance.
Now I always:
- Use descriptive file names
- Compress images before uploading
- Add proper ALT text
It may feel small, but over time it helps keep the blog faster and more structured.
4. Using Unrealistic Images
At one point, I started generating very “perfect” AI images — luxury offices, overly clean setups, dramatic lighting, and unrealistic work environments.
At first, they looked impressive. But later I noticed they didn’t feel relatable. For blogging topics like SEO, freelancing, or content creation, readers connect more with simple and realistic visuals.
Now I avoid images that look too fake or too polished. Instead, I prefer:
- natural lighting
- normal workspaces
- simple desk setups
- real-looking people and environments
This makes the blog feel more trustworthy and human.
5. Copying Other Creators Exactly
In the beginning, I used to look at other bloggers and try to copy their image style exactly. Sometimes I even tried to recreate their prompts word-for-word. But I realized this doesn’t work long-term.
Every blog has a different tone, audience, and style. Copying someone else makes your content look unoriginal and disconnected from your own writing.
Now I only take inspiration from others, not direct copying. Instead of copying, I focus on building my own visual style — simple, clean, realistic images that match my blog personality.
Over time, I understood that most mistakes in AI image creation are not about the tool itself. They are about how we think while creating prompts and selecting images.
Once I fixed these basic mistakes, my workflow became smoother, faster, and much more consistent.
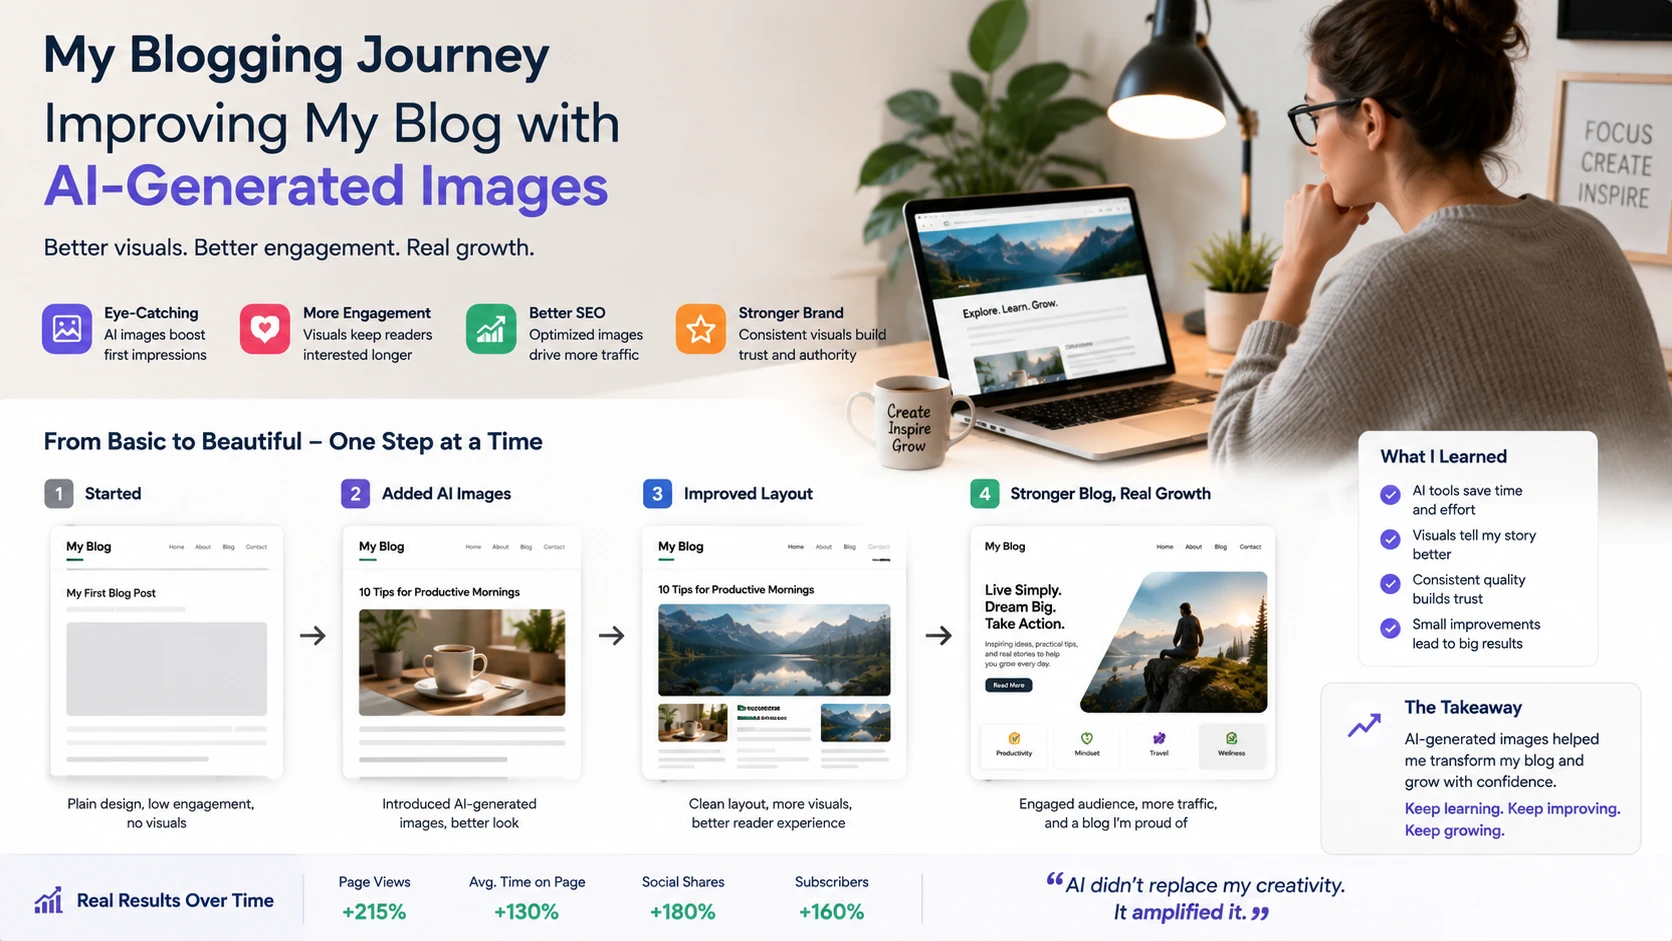
My Real Experience Using AI Images for Blogging
Honestly, I didn’t expect AI images to change my blogging experience this much.
When I first started blogging, I used to struggle a lot with visuals. I would either search for stock images or quickly download something that “kind of” matched the topic. Most of the time, the images felt generic and didn’t really connect with what I was writing.
My blog looked okay, but not professional. Then I started using AI images properly, step by step, and slowly I noticed real changes.
My content started looking more polished. Even simple blog posts suddenly felt more organized and well-designed just because the images matched the topic better. One thing I clearly noticed was this. People judge your blog faster than you think.
Before reading a single line, they see the featured image, and that first impression matters a lot. When I improved my AI images, my blog immediately felt more serious and trustworthy. Another big change I saw was on Pinterest.
Earlier, I would post random or reused images, and the engagement was very low. But after I started creating proper Pinterest pins using AI and editing them slightly, I noticed more clicks and saves.
Even small changes like better text placement, cleaner backgrounds, and stronger visuals made a difference. It didn’t happen overnight, but slowly I saw improvement in traffic coming from Pinterest. I also noticed something interesting with reader behavior.
When my blog images started matching the content better, people stayed longer on my posts. I think it’s because the visuals helped them understand the topic more easily and made the article feel less boring.
For example, if I’m writing about SEO growth and I show a clean analytics-style image, it helps readers stay connected with the idea instead of just reading plain text. But the biggest change for me was not traffic or engagement. It was my mindset.
Earlier, creating images felt like a boring task I had to complete before publishing a blog post. I used to rush it or avoid spending too much time on it. Now it feels completely different. Creating AI images actually feels creative and fun.
Sometimes I experiment with prompts just to see what kind of visuals I can create. Other times I try different styles or moods just to match the article better. It feels less like work and more like part of the creative process. That shift made blogging much more enjoyable for me.
I still use Canva for editing whenever I need to add text, resize images, or adjust designs. But AI has reduced a lot of my workload because I don’t need to search for images anymore or start from zero.
Everything becomes faster. And honestly, for beginners, that is the most important part.
Blogging already takes time — writing content, doing research, editing, and publishing. If image creation also takes too long, it becomes overwhelming. AI helps reduce that pressure. It doesn’t just save time; it also helps improve quality if used properly.
Looking back, I think the biggest benefit of using AI images is not just better visuals, but a smoother blogging workflow. Everything feels more connected now — writing, visuals, and promotion all fit together more naturally. once that happens, blogging stops feeling stressful and starts feeling more creative.
Do AI Images Help in SEO?
AI-generated images don’t directly boost SEO rankings on their own. Google doesn’t rank a page higher just because the images were made with AI. But indirectly? Yes — they can absolutely help.
High-quality visuals make content more engaging and easier to consume. When readers stay longer on your page, interact with your content, or share it online, those signals can support overall blog performance and visibility.
AI images can improve things like:
- User engagement
- Time spent on the page
- Social media shares
- Pinterest traffic
- Overall visual appeal and professionalism
And all of those factors contribute to stronger content performance over time. AI images become even more effective for SEO when you combine them with proper optimization practices, such as:
- Writing descriptive ALT text
- Using SEO-friendly file names
- Compressing images for fast loading speed
- Adding relevant context around the image
- Using responsive image sizes for mobile users
In short: AI images are not a direct ranking factor, but they can strengthen the user experience — and better user experience often leads to better SEO results.
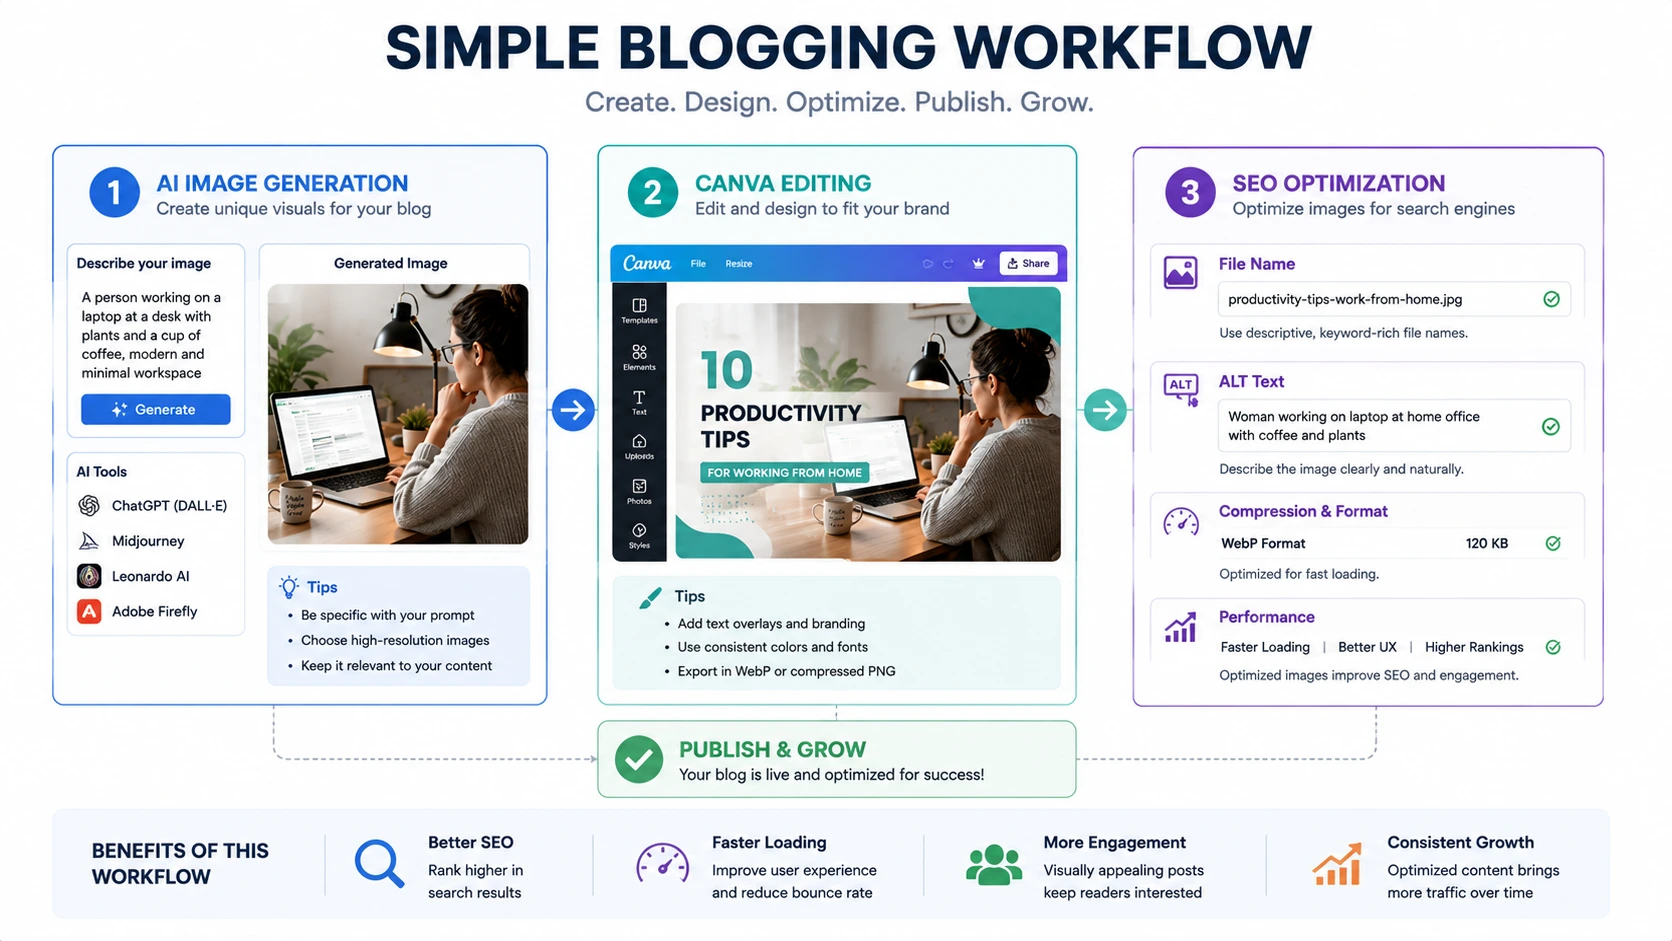
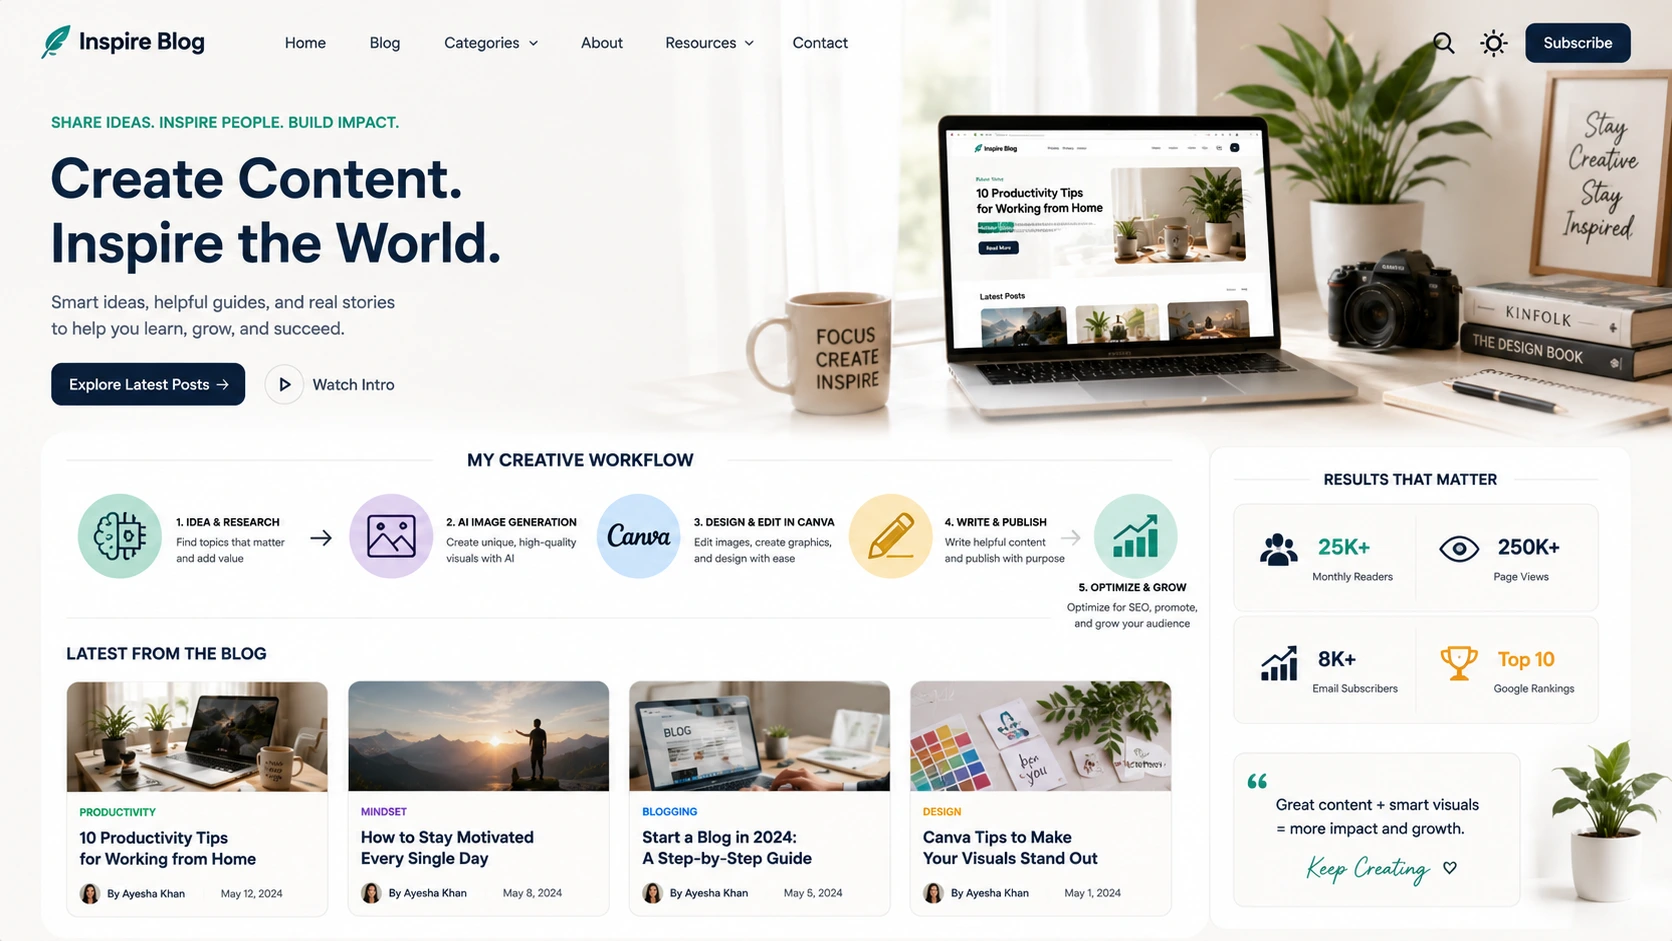
My Simple AI Image Workflow
After trying different methods, tools, and styles, I finally settled on a workflow that feels simple and easy to repeat. I don’t overthink it anymore, and I don’t jump randomly between steps like I used to in the beginning.
Now I follow a clear process every time I create images for my blog.
1. Write Blog Section
First, I write the blog section completely. I don’t think about images at this stage. I just focus on writing the content properly. Earlier, I used to do both together — writing and thinking about images at the same time — but that slowed me down and made everything messy.
Now I separate writing and visuals. Once the content is ready, I already understand what the section is talking about, so images become easier to plan.
2. Think About Visual Idea
After writing, I take a few seconds to think: “What kind of image will match this section?” I don’t overcomplicate this step.
I just try to understand the mood and message of the paragraph. Sometimes it’s a workspace, sometimes it’s a chart, sometimes it’s an emotional scene like stress or productivity. This step is small, but it helps me avoid random images that don’t fit the content.
3. Create AI Prompt
Then I write the prompt using my simple structure. At this stage, I don’t rush. I include: subject, environment, style, mood ,quality, etc.
I learned that if I write the prompt properly here, the rest of the process becomes much easier. A good prompt reduces the need for too many edits later.
4. Generate 2–4 Versions
This is something I never skip now. Earlier, I used to accept the first image. But now I always generate multiple versions of the same idea.
Sometimes version 1 looks okay, but version 3 feels much more natural. Small changes in lighting, expression, or background can completely change the image quality. I usually compare them side by side and choose the one that fits the blog tone best.
5. Edit in Canva if Needed
After selecting the best image, I do light editing only if required. Most of the time, I use Canva for simple adjustments like:
- adding blog title
- changing colors slightly
- adding arrows or icons
- resizing for Pinterest or blog thumbnails
I don’t over-edit because I prefer keeping the image clean and readable. Editing is just a finishing touch, not a full redesign.
6. Compress and Optimize
Before uploading, I always optimize the image. This step became important after I noticed my website loading slowly in the beginning.
Now I make sure to:
- compress image size
- convert to WebP format
- reduce unnecessary file weight
It doesn’t take much time, but it helps my blog stay fast and smooth.
7. Upload with ALT Text
Finally, I upload the image with proper file names and ALT text. I avoid random names like “image1.png” and instead use descriptive ones that match the topic.
ALT text is usually a simple description of what is in the image, written in natural language. This helps with SEO and also keeps everything organized.
Conclusion
Learning how to create images using AI for blog posts is honestly one of the most useful skills I picked up as a blogger.
At first, I didn’t take it seriously. I thought images were just something extra you add at the end. But after using AI properly and building a simple system, I realized how much it actually improves the whole blogging process. From my experience, it made blogging feel: faster, more creative, more professional, more engaging.
Earlier, I used to waste a lot of time searching for the “right” stock image and still end up with something that didn’t fully match my article. Now I can create exactly what I need in a few minutes, and it fits my content much better.
But one thing I clearly understood during this journey is this: AI does not replace creativity. It only supports it.
The AI can generate images, but it cannot understand your blog, your audience, or the feeling behind your content the way you do. That part still depends on you.
The real improvement came when I started guiding the AI properly — through better ideas, better prompts, and small editing decisions. Once I learned that, my results became much more consistent. So my simple advice is: Start small.
Don’t try to make perfect images in the beginning. Just practice creating basic prompts and see how the AI responds. Over time, you will naturally understand what works and what doesn’t. Experiment with different prompts, styles, and moods. Even small changes can teach you a lot.
Most importantly, don’t rush the process. The more you practice, the more your own visual style will start to form. That’s what really makes a blog stand out — not just good images, but a consistent visual identity. Because in modern blogging, visuals matter more than ever.
When you combine good writing with strong visuals, your content becomes much more powerful and easier for people to connect with.
Frequently Asked Questions (FAQs)
1. How can I create images using AI for blogging?
Yes, beginners can easily use AI image tools. Most of them are designed in a very simple way, where you just type a prompt and get an image. You don’t need any design experience to start.
2. Are AI-generated images free?
Many AI tools offer free plans or free credits. You can start without paying, but some advanced features or higher-quality generations may require a paid plan.
3. Which AI tool is best for bloggers?
From my experience, beginner-friendly tools like ChatGPT image generation and Canva work really well for bloggers. One is good for generating images, and the other is great for editing and adding text.
4. Do AI images help Pinterest traffic?
Yes, they can help a lot. Pinterest is a visual platform, so attractive and clear images can improve clicks, saves, and overall engagement.
5. Can AI images improve blog appearance?
Absolutely. Good visuals make a blog look more professional, organized, and trustworthy. Even simple articles look better when paired with relevant images.
6. Do I need design skills?
No, you don’t need design skills. You only need basic prompt-writing skills and a little practice in choosing styles and moods.
7. What format is best for blog images?
WebP is usually best for speed and performance, but PNG is also fine when you need higher quality or editing flexibility.
8. Should I edit AI images?
Editing is optional, but small edits can improve branding and clarity. Even simple changes like adding text or adjusting colors can make a big difference.
9. Are AI images unique?
Yes, most AI images are uniquely generated each time based on your prompt. Even small prompt changes can produce completely different results.
10. Can AI images replace stock photos?
In many cases, yes. AI images give more control because you can create exactly what you need instead of searching for similar stock photos.
11. How do I write better prompts?
A good prompt usually includes:
- Subject
- Environment
- Style
- Mood
- Quality
Clear and structured prompts always give better results.
12. Can AI create Pinterest pins?
Yes, AI can generate base images, and you can then use Canva to turn them into proper Pinterest pins with text and layout design.
13. Are AI images good for SEO?
Yes, indirectly. When images are optimized properly with file names, ALT text, and compression, they can improve page experience and SEO performance.
14. What is the biggest beginner mistake?
The biggest mistake is using vague prompts like “blog image” or “SEO photo.” These give generic results that don’t match the content.
15. Can AI create realistic images?
Yes, modern AI tools can create very realistic images, especially when you clearly describe lighting, environment, and style in the prompt.
16. Should every blog post have images?
Yes, most blog posts perform better with images because they improve readability, engagement, and user experience.
17. How many images should a blog post contain?
It depends on length, but usually 5–10 images work well for a full blog post. Short posts may need fewer.
18. Is Canva still useful with AI?
Yes, very useful. AI creates the base image, but Canva helps with final touches like text, resizing, branding, and layouts.
19. Can AI save blogging time?
Definitely. It reduces the time spent searching for images and allows you to create visuals much faster.
20. What matters most in AI image creation?
The most important factor is the quality of your prompt. A clear, structured prompt always leads to better and more useful images.